Creating Sliceforms
In our paper we describe ways in which students can design and create their own sliceforms. This is a challenging process that brings them in contact with many important learning opportunities in geometry. This is a positive opportunity.
CAD Sliceforms
Sliceforms are objects that are prime candidates for modeling using computer aided design (CAD) programs. In an educational setting the main issue involves the steep learning curve for most CAD programs and the significant costs for software licenses (see “Modeling and Exploring 3D Worlds Using Google SketchUp” by Fleron and Livingstone).
Eisenberg and other at the University of Colorado Department of Computer Science have described a system “at a very early stage of development” for building wooden sliceform models using CAD and a laser cutter.
and
http://l3d.cs.colorado.edu/~ctg/Sliceforms.html)
Google SketchUp Sliceforms
We like the CAD program Google SketchUp (GSU) because it is so useful for geometry education, because it is free, and because the learning curve is fairly shallow.
There are a few options to help you make sliceforms in automated ways. There are two useful GSU PlugIns (Ruby scripts) that can help. The first to be developed is called Slicer. It will take prescribed slices and then display them sequentially on a single plane to be printed. (http://www.cad-addict.com/2009/07/sketchup-plugins-slice-your-model.html) Unfortunately, there is no immediately apparent way to add the slots to these nice cross-sections, a non-trivial problem.
In contrast, SketchUp SliceModeler v1.4 will not only take slices, but will also put slots at regular locations with prescribed widths. This PlugIn is not free, but can be obtained for a small fee from Public Art International. (http://www.public-art-international.com/catalog/product_info.php/products_id/200 )
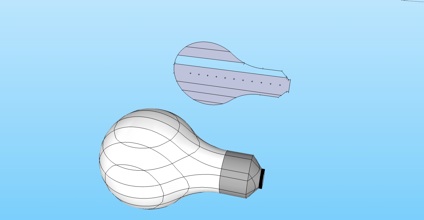
The lightbulb template, which appears in our paper as well, was actually made using a brute-force approach on GSU.
If you want to try to mimic our approach, here’s an outline of what you can do:
1) Make your solid to be Sliceformed.
2) Decide on a scale for your slice lattice.
3) Use our ``Sliceformer’’ (GSUSliceformer.skp) or build your own. It is simply a square lattice of intersecting planes which have the scale you decided on in 2). (In GSU this is very easy. Make one plane, move a copy, and then type n/ to make n equally spaced copies. Now copy all of the planes, rotate 90 degrees, and reposition with the move tool.)
3) Move the Sliceformer from 3) onto your solid, being sure to place it appropriately, and then Intersect With Model (under Edit).
4) Select the Eraser. Begin erasing the excess of the Sliceformer that extends beyond your model. Quickly your model will be all that remains, but it will be ruled – both on its surface and internally as shown below.

5) Since the solid is ruled internally, all you need to do is Copy the slices and remove each from the model. View the ruled solid along one of the slices. Carefully select a thin rectangle surrounding this slice. Move this slice. You will see that some of the local geometry has stuck to your slice. Simply remove it using the Eraser. (Again, see the image below.)
6) Slice by slice remove your copies of your sliceform cross sections from the model using Copy/Move.
7) The slots will go through the entirety of each slice. Use the line tool to bisect each and erase half.
Copyright 2011 Julian Fleron and Volker Ecke.